
Dr. Jack Griffin
It would be great if every case was perfect. Wait, come to think of it, I’ve NEVER done case I was 100% happy with. So when planning and prepping a case, the limitations should be identified early, shared with laboratory technician, and explained to the patient so that there are no post treatment disappointments. Everyone must be on board with the degree of “non-perfection”.
Less than ideal case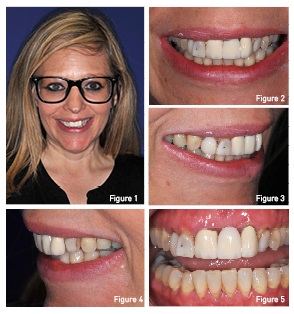
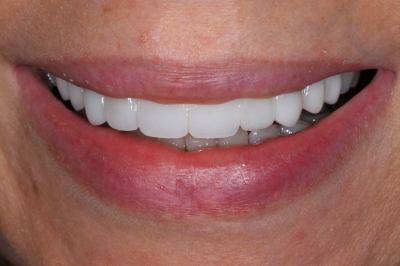
A very attractive lady wanted a better smile and for some reason came to me (fig 1). Her midline was shifted about 3mm to her right but had no noticeable cant. There was some marginal porcelain work, failing composites, and recurrent decay (fig 2). Her main complaint was the staining and un-even color and, of course, she wanted them whiter (fig 3-4).
A full series of photos was taken and sent to the laboratory with models, bite registration, and the goals of treatment. The wax-up, reduction guide, and matrices are invaluable for efficient case preparation (fig 6). We measured the central incisors and determined a pleasing incisal edge position and the wax-up was done to that position (fig 7).
Gingiva
Diode lasers have brought aesthetic dentistry to a new higher level of gingival expectations. Biologic width violations always are a limiting factor with gingivoplasty and the desire to keep final restoration margins 2.5-3 mm away from the boney crest should not be ignored. The laboratory sends a tissue alteration form that can act as the blueprint for gingival re-shaping (fig 8).
The diode laser was used to modify gingival heights and to improve emergence profiles of the anterior teeth (fig 9). Ideally the gingival margins of the cuspids and central incisors would be on the same horizontal plane with the laterals being 0.5-1.0 mm incisal from that plane. In this case a compromise had to be made because of recession on #7 and #10 and the height of bone on #6 and #8 leaving the less than ideal 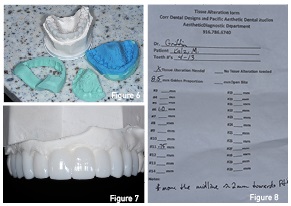 levels.
Preparation color
Decay and old restorations were removed. The right cuspid had a metal post that seemed very solid and so it was air abraided, Microetcher (Danville), with 50 micron aluminum oxide . All teeth needing build up material had a universal bonding agent applied, air thinned, and cured. (fig 10) The build ups in this case were done with a dual cure bioactive/regenerative material called Activa (Pulpdent) except for #6 which had a dentin opacity composite placed to block color. Preps were finished and shaped (fig 11).
Ideally, depending upon the restorative material, the ceramist would like to have preparations of the same shade and intensity so that the translucency of the ceramics can be the same. In this case, the value of #6 was more than the other teeth and certainly that would have to be factored in the color and opacity used for the crown material (fig 12).
Pontic site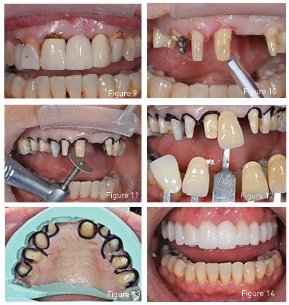
The ideal pontic in this day of heightened dental awareness is the ovate pontic. Being 100% convex we have the ability to have emergence profiles and papilla support that is very natural looking. However, the soft tissue and boney structure must be ample enough.
In this case, with #9 being missing for over 25 years, the buccal plate had resorbed revealing a concave buccal deficiency and the horizontal bone height was then compromised. A graft and perhaps an implant would be a great option for this patient, but because of the ordeal to go for a graft and the fact that she already had crown and bridge, an implant was not chosen. Therefore the desire for an ovoid pontic shape and contour were compromised because of the tissues available.
Reduction guide
A silicone reduction guide made to the wax-up is always a great guide for reduction and planning. Not only can proper preparation reduction be checked, but also the angulation and position of the preparations (fig 13).
When the guide was tried it, it was obvious that both lateral incisors were deficient in facial reduction and the left one was not prepared enough on the mesial to fit wax-up proportions. Because of the metal post in one and the fact that the other lateral was still vital, it was my decision to compromise and not reduce any more despite the lack of clearance with the guide. Reducing teeth to within the guide would have resulted in a post removal in one tooth and endo in the other.
I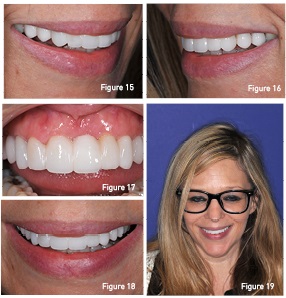 nsertion
So despite my feeling of case imperfection, the artists at Corr/and The Pacific Aesthetic Laboratory Group made everything work well (fig 14). In the pontic area a modified ridge lap worked fine and with her high smile line it had no effect on final case aesthetics. Despite the fact that preparation shades were not equal, the zirconia copings on the bridge and crowns hid the color variations well. And despite inadequate reduction on the laterals, the incisor position looked natural and well balanced (fig 15-18).
The moral to this story? Do as well as you can and don’t beat yourself up over the imperfections in a case. It’s the overall result and patient happiness that determines the success of a case. Even though we try our hardest and despite our best effort, some of the smaller details must occasionally be compromised (fig 19). Despite compromises made in this case, the technicians at Corr Dental Designs and The Pacific Aesthetic Laboratory Group made it all work.
If you have questions about this case or would like to send a case, please contact Gary Vaughn, CDT, CTO at [email protected] or at (916) 786-6740. Visit The Pacific Aesthetic Laboratory Group online at www.pacificaestheticdentalstudio.com.